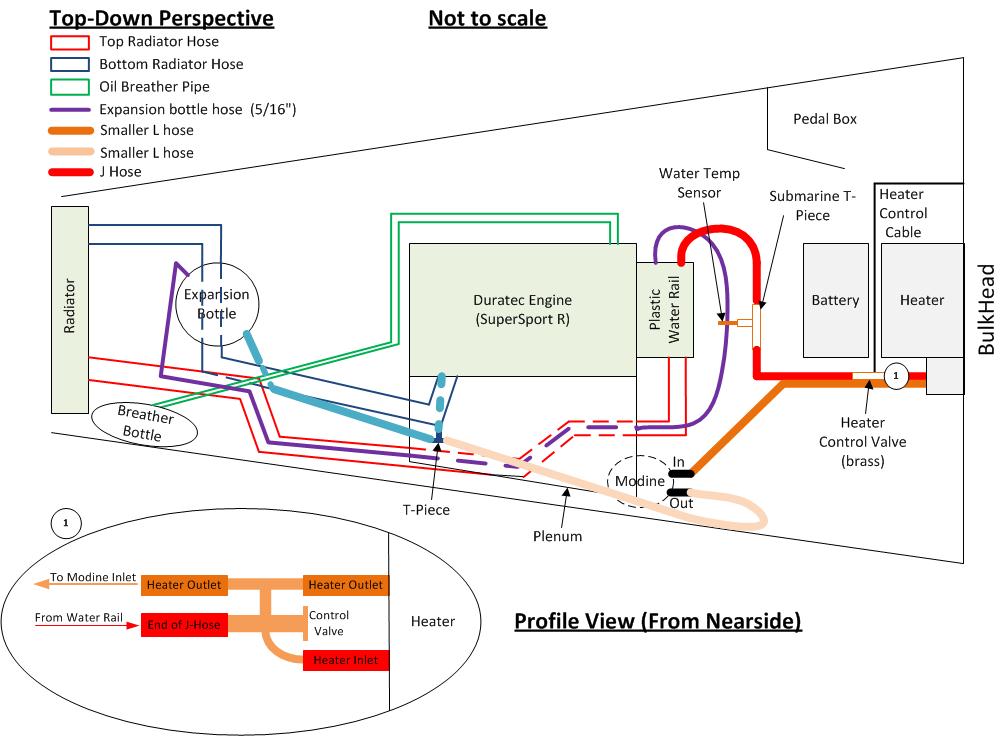
Since the pulleys, starter, and so on were in place next up was to make heads or tails of the cooling. The weather this week was freezing cold, in the low teens, so the garage was about as cozy as a wampa cave which gave me the opportunity to go over the manual a dozen times. By Saturday I had a good idea of what should go where, however, it was also apparent the parts I had were not at all similar to what’s in the manual. For starters, I had an oil cooler rather than the water modine that is mentioned in the manual and an aluminum water rail that looks like it should fit somewhere on the engine, but was never able to figure out how exactly it lined up. Further, the large radius long L host went all the way to the front of the car making the aluminum water rail superfluous. I decided I’d just figure it out as I go based on Tom Wood’s blog and his cooling diagram.
And my missing spare wheel, alternator bolts, and oil breather bottle arrived Friday afternoon. Thanks, Derek!

Before starting the cooling lines though, I needed to figure out how to attach the alternator pulley. Kim was around and offered to help so we took a go at it and quickly discovered we needed something massive to get it to stay. There are no torque specs in the Haynes or Caterham manuals for the center nut on the pulley, just the 18 ft-lb for the mounting bolts. Since I now had the real hardware from Caterham we decided to take it off the engine, clamp it in the vice, and then torque to 95 ft-lb which seems to be the generally arrived at torque spec for an alternator pulley bolt based off other Ford engine threads I found. I have absolutely no idea if that is right, but I’ll go with it since it seemed logical to me. I also called Adam, who happened to just be right down the street ironically enough. He popped over for a quick second and confirmed 95 ft-lb’s sounded high, but somewhere in the 60-100 ft-lb range would be appropriate. I got it up to about 65 ft-lb before fear set in and felt like I was stripping something either in the alternator or … something. I don’t know, 95 just seems insanely high so I stopped. Note, the pulley and alternator are not keyed so its just torque holding it on. Maybe 95 is right?
Regardless, the vice put some good sized grooves into the outer edge of the pulley and some burrs in the inside edge. I took a metal file and smoothed everything out so wouldn’t cut the belt. We then attached the alternator to the engine with the right bolts, torqued to 18 ft-lb per the Haynes manual, and marked the alternator bolt. All of that work took about 2 hours and I was not pleased – this should really be much easier to do.

Next up we routed the upper and lower radiator hoses. Fairly straightforward based on Tom’s blog and diagram.

We then moved on to the rear of the engine and began attaching the other hoses and heater. The J hose was way too big for the port it attached to, but based on a careful look at Tom’s pictures it appears he had the same setup and it worked. We attached the J hose and put a hose connector on to hold it in place. Note, using the silicone spray as a lubricant is key to keeping yourself sane for the tighter hoses. One difference between Tom’s pictures and our approach was the submarine was mounted onto the plastic water rail. It just so happens the threaded boss on the submarine fits perfectly into the screw holes on the plastic rail so I attached it to keep it steady. I also screwed in the temperature sender hand tight for now.

Still mildly confused by the cooling lines, I went ahead and moved to the heater to get it attached. I took out the battery for more clearance then aligned the holes for the heater. The manual was accurate here, everything attached without issue, however, I’m missing the top set screws to attach the heater to the scuttle just as others were. Another email to Derek for the parts.
At this point I was still unsure about the cooling lines, whether or not to use the aluminum water rail, what was right way, what was best way, the alternator debacle had me still frustrated and concerned, and now was missing screws for the heater. I proceeded to get frustrated, which lead to a brewing argument with Kim because I was in a foul temper, and so we stopped there. One last pic of the water rail so I can post to the forums and figure out what needs to be done.

Daniel